


When stranded in the wilderness or camping for an extended period, building a shelter is essential for survival. A good outdoor survival shelter not only provides protection from the elements but can also include a heating system, such as a chimney, to keep the inside warm and safe. In this guide, I will walk you through the steps of building a durable outdoor survival shelter equipped with a functioning chimney to channel smoke from a fire.
The article is divided into sections, each focusing on a different stage of the process. Let’s begin!

Table of Contents
- Choosing the Location
- Gathering Materials
- Building the Shelter Framework
- Constructing the Roof
- Insulating the Shelter
- Building the Chimney
- Finishing Touches
- Safety Considerations
1. Choosing the Location
Overview:
Selecting the right location is the first and most important step when building any shelter. The spot should offer natural protection and be close to resources like wood, water, and fire-making materials.

Steps:
- Look for Natural Wind Barriers: Choose a location protected from the wind, such as the side of a hill or near natural barriers like boulders or dense trees.
- Check for Ground Elevation: Ensure the spot is not in a low-lying area prone to flooding. Higher ground ensures proper drainage.
- Avoid Wildlife Paths: Try not to set up too close to animal trails, nests, or water sources frequented by wildlife.
Visual Illustration:
(A diagram showing an ideal location on the side of a hill with natural wind barriers and elevated ground.)
2. Gathering Materials
Overview:
Now that the location is set, you will need to gather the right materials to build a sturdy shelter. These will include materials for the structure itself and the chimney.

Materials Needed:
- Long, sturdy branches for the framework
- Small branches and twigs for filling gaps
- Large leaves, grass, and moss for insulation
- Rocks and stones for the chimney and fire pit
- Mud or clay for sealing gaps and the chimney
- Cordage or vines for binding materials together
Visual Illustration:
(A drawing showing the types of materials needed, including sticks, leaves, rocks, and mud.)
3. Building the Shelter Framework
Overview:
The framework forms the skeleton of your shelter. A lean-to design or an A-frame is ideal for this shelter, offering simplicity and stability.

Steps:
- Frame Construction: Use two long, thick branches to form the main beams of your shelter. Lay them down at an angle against a supporting tree or cross them at the top to form an A-frame.
- Supporting Walls: Use additional branches to create walls, leaning them securely against the framework.
- Crossbars: Add horizontal branches between the vertical ones to reinforce the structure and provide more support for roofing material.
Visual Illustration:
(A diagram showing the basic framework of an A-frame shelter with crossbars in place.)
4. Constructing the Roof
Overview:
The roof will protect you from rain, wind, and snow, making it one of the most critical components of the shelter.

Steps:
- Layer the Roof: Start by placing large branches over the crossbars to form a solid base.
- Add Insulation: Pile on layers of leaves, grass, and moss for insulation. These layers should be thick enough to prevent rain from seeping through.
- Ensure Drainage: Construct the roof at a steep enough angle to allow water to drain off easily.
Visual Illustration:
(A diagram showing how to layer the roof using branches and natural insulation.)
5. Insulating the Shelter
Overview:
In cold weather, proper insulation is crucial. The more insulation you use, the better your shelter will retain heat.

Steps:
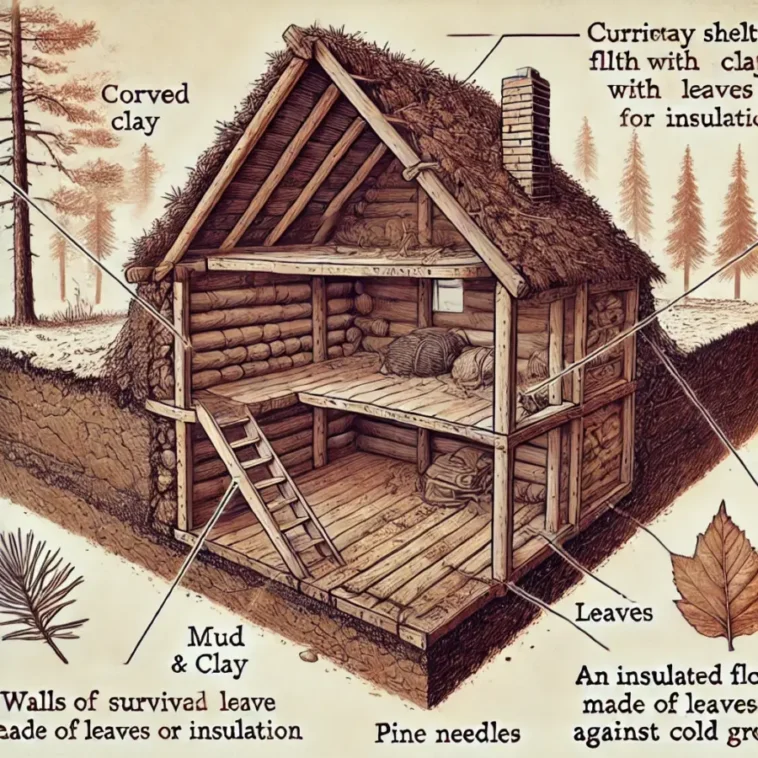
- Fill the Gaps: Use mud, clay, and additional branches to fill in any gaps in the walls. This will keep cold air from entering.
- Ground Insulation: Lay down a thick layer of leaves, pine needles, or grass on the floor to insulate from the cold ground.
- Interior Layering: If possible, create an inner layer of insulation using more branches and leaves, trapping air for added warmth.
Visual Illustration:
(A cutaway diagram showing walls filled with mud and clay and the insulated floor.)
6. Building the Chimney
Overview:
The chimney is essential for venting smoke from the fire inside the shelter, allowing you to stay warm without suffocating from smoke inhalation.

Steps:
- Dig a Fire Pit: Create a fire pit on one side of the shelter but close enough to provide warmth. Line the pit with rocks to contain the fire.
- Stack Rocks for the Chimney: Begin stacking flat rocks or stones vertically, forming a chimney that extends from the fire pit up through the roof. Leave a small opening at the top for smoke to escape.
- Seal with Mud: Use mud or clay to seal the spaces between the rocks. This will prevent smoke from leaking into the shelter and ensure the chimney is stable.
- Test the Chimney: Light a small fire and observe the smoke. If the smoke escapes smoothly through the chimney, the structure is functional. If not, adjust the rock stack to improve airflow.
Visual Illustration:
(A diagram showing the placement of the fire pit and the chimney structure made from rocks and mud.)
7. Finishing Touches
Overview:
To complete the shelter, you’ll need to reinforce the structure and make it more comfortable for longer stays.
Steps:
- Add a Door: For added warmth, create a simple door using branches tied together or a heavy layer of moss and grass. You can use cordage to secure it in place.
- Ventilation: Ensure there is proper airflow in the shelter. While the chimney will help, leaving a small gap in the roof or creating a vent hole can ensure fresh air circulation.
- Fireproofing the Shelter: Add a layer of mud or clay around the area near the fire pit to prevent any accidental sparks from causing a fire.
Visual Illustration:
(A diagram showing the shelter with the door in place and the final chimney setup.)
8. Safety Considerations
Overview:
Safety is paramount when building a shelter that includes fire. You need to take precautions to prevent fires and ensure your shelter is structurally sound.
Tips:
- Position the Fire Safely: Always place the fire in a spot where it won’t easily spread. Keep a perimeter of cleared ground around it.
- Regularly Maintain the Chimney: Over time, mud and rocks may shift. Regularly check the chimney for blockages or weak spots.
- Ventilation is Key: Make sure your shelter has adequate ventilation to avoid carbon monoxide buildup.
Visual Illustration:
(A final diagram emphasizing fire safety with proper chimney venting and a well-contained fire pit.)
Conclusion
Building a survival shelter with a chimney is a rewarding project that can provide you with warmth and protection in the wilderness. By following these steps, you can create a durable, insulated shelter that ensures your safety and comfort in the great outdoors. Always be mindful of your surroundings, use local materials efficiently, and prioritize safety when working with fire.
Having a functional chimney is an added bonus that makes the shelter even more livable during extended stays. Keep refining your survival skills, and remember that practice makes perfect when it comes to wilderness shelters.